
Git in Action - Upload Project Code To Github Repository Using Git

So after learning the basic commands of git in our previous section, let's see Git in action.
If you already have a project to track your files then you can skip this section and if not then continue.
Initializing a Repository from Non-existing Directory:
So if you don't have a project folder to track with git then we will create one from scratch. Follow the below steps:
- Create a folder with the name
'test'on Desktop or you can create it anywhere on your system. - Then open your terminal and change your directory to 'test' folder in my case it will be cd
/home/altaf/Desktop/Tutorial/Git/testin your case cd 'path of your test directory' - Now type
git initto initialize a git repository.
altaf@kali:~/Desktop/Tutorial/Git/test$ git init

Initialized empty Git repository in /home/altaf/Desktop/Tutorial/Git/test/.git/
This creates a new subdirectory named .git that contains all of your necessary repository files --- a Git repository skeleton.
Now create two files in the test directory named them test1.txt and test2.txt, you can use the below command to create them directly from the terminal.
$ touch test1.txt test2.txt
And also add some random data inside both the files.
So now we have a project folder with some files. Now move ahead to start working in the project folder with git and now you can skip the next section because you have already created a project folder in this section initialized it with git.
Initializing a Repository in an Existing Directory
If you have a project directory that is currently not under version control and you want to start controlling it with Git, you first need to go to that project's directory. If you've never done this, it looks a little different depending on which system you're running:
for Linux:
$ cd /home/user/my_project
for macOS:
$ cd /Users/user/my_project
for Windows:
$ cd C:/Users/user/my_project
and type:
$ git init
Example:
altaf@kali:~/Desktop/Tutorial/Git/test$ git init

Initialized empty Git repository in /home/altaf/Desktop/Tutorial/Git/test/.git/
This creates a new subdirectory named .git that contains all of your necessary repository files --- a Git repository skeleton.
So now we have a project folder which is now under version control and now we can start controlling it with Git.
Git in Action:
Now let's start controlling our project with git,
Run the git status command to check the status of your local repository,
altaf@kali:~/Desktop/Tutorial/Git/test$ git status
Output:
On branch master

No commits yet

Untracked files:

  (use "git add <file>..." to include in what will be committed)

        test1.txt

        test2.txt

nothing added to commit but untracked files present (use "git add" to track)
It says you have untracked files test1.txt and test2.txt, use git add . command to track all the files present in the directory or use can use git add test1.txt and git add test2.txt to track a file using the filename.
Now run the following commands:
altaf@kali:~/Desktop/Tutorial/Git/test$ git add .

altaf@kali:~/Desktop/Tutorial/Git/test$ git status
Output:
On branch master

No commits yet

Changes to be committed:

  (use "git rm --cached <file>..." to unstage)

        new file:   test1.txt

        new file:   test2.txt
Now we have added the files into the staging area (where we save the file so that git is able to track any changes made to those files) and This stages them for the first commit. Now we are ready to commit the changes.
Now run the following commands:
$ git commit -m "First commit"
Output:
[master (root-commit) 8db38b6] First commit

 2 files changed, 0 insertions(+), 0 deletions(-)

 create mode 100644 test1.txt

 create mode 100644 test2.txt
This will Commit the files that you've staged in our local repository.
So before pushing our code into the Remote repository i.e on Github (our online repository) let's check one more command.
Git Log:
The Git Log tool allows you to view information about previous commits that have occurred in a project.
altaf@kali:~/Desktop/Tutorial/Git/test$ git log
Output:
commit 8db38b60919a67b9f912d1e9e782a5ccb7588eb4 (HEAD -> master)

Author: altaf99 <iamaltafshaikh07@gmail.com>

Date:   Wed Apr 1 22:37:02 2020 +0530

    First commit
Pushing our code on Remote Repository (Github):
Before pushing our code we need a repository to share/upload our code, so let's create one.
- Go to https://github.com/ and login into your account.
- In the upper-right corner of any page, click on +, and then click New repository.

3. Type "hello-world" as a name for your repository, and an optional description.
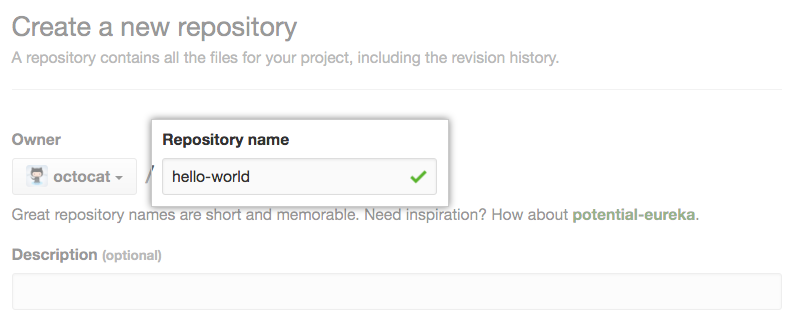
4. Choose to make the repository either public or private. Public repositories are visible to the public, while private repositories are only accessible to you, and people you share them with.

5. When you're finished, click Create repository.
6. At the top of your GitHub repository's Quick Setup page, click to copy the remote repository URL.
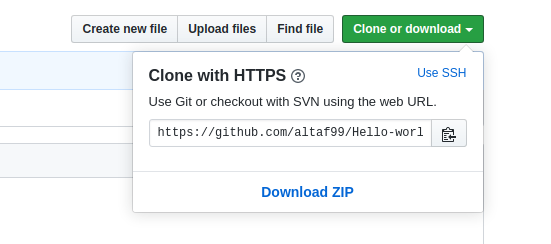
Now to connect Remote repository "hello-world" with our local repository will use git remote add origin command which we have previously learned.
In Terminal, add the URL for the remote repository where your local repository will be pushed.
$ git remote add origin https://github.com/altaf99/Hello-world.git
Now Verifies the new remote URL
$ git remote -v
altaf@kali:~/Desktop/Tutorial/Git/test$ git remote -v
#output

origin  https://github.com/altaf99/Hello-world.git (fetch)

origin  https://github.com/altaf99/Hello-world.git (push)
Now let's Push the changes in your local repository to GitHub.
$ git push origin master
Kudos!! We have Pushes the changes in your local repository up to the remote repository we have specified.
Congratulations!! We have successfully pushed the code into our remote repository and also we have learned and understand the basics of Git and we are also successfully able to implement the Git commands.
Hope you enjoyed the tutorial, please share this tutorial with your friends if you find this tutorial helpful.
Thank You!!
We will see the advanced concept of Git in upcoming sections.


